
Building a Personal Site with Jekyll & Minimal Mistakes
I learned a lot while building this website; I hope to share it so that it might be helpful for anyone trying to do the same. I’m sure you’ll notice that I’m far from an expert in the subjects we’re going to explore here; this is my first foray into web development. If you have any corrections, or things I’ve misunderstood, I’d love to hear about it! Just post a comment.
The site is built using Jekyll, using the theme Minimal Mistakes. I host it on Github pages, and purchased and manage my domain through Google Domains. We’ll go through each of these steps in detail. I’ll assume that you have the up-to-date versions of Ruby and Jekyll on your local machine. I’m going through all this in macOS, which may affect some of the shell commands I give, but translating to Windows shouldn’t be too hard.
Making a site with Minimal Mistakes
The website for Minimal Mistakes includes a great quick-start guide; I recommend the
Starting with jekyll new section as a place to start. Using this you should be
able to establish a base site with some simple demonstration content, using the Minimal
Mistakes theme.
You can always look directly at the source code for my site if you want
to see exactly what I have in my Gemfile, or _config.yml, or whatever.
Enabling MathJax
In order to enable MathJax, which renders the mathematical equations you see in my
posts, you’ll need to edit the file scripts.html contained in the folder _includes/
to include a line enabling MathJax. However, you’ll want to avoid overwriting the
contents of the default scripts.html.
So, we need to find where bundle is storing the Gem for Minimal Mistakes. To
find this, do
bundle show minimal-mistakes-jekyll
If you just want to navigate directly to that directory, do
cd $(bundle show minimal-mistakes-jekyll)
If bundle doesn’t seem to have minimal-mistakes-jekyll installed, then you should
add the line gem "minimal-mistakes-jekyll" to your Gemfile, and run bundle to
install the Gems.
Now you can copy the default scripts.html into your site:
cp _includes/scripts.html /path/to/site/_includes/scripts.html
Open the copied scripts.html in your editor of choice,1 and add the
following lines at the end:
{% if page.mathjax %}
<script type="text/javascript" async
  src="https://cdnjs.cloudflare.com/ajax/libs/mathjax/2.7.6/MathJax.js?config=TeX-MML-AM_CHTML">
</script>
{% endif %}
And you’re done!2 Now, you can type $$x_1$$ to see \(x_1\), and so
on. The $$...$$ syntax will generate inline math if used inline, and will
generate a display equation if used on its own line. So, if one enters
$$ f(a) = \frac{1}{2\pi i} \oint_\gamma \frac{f(z)}{z-a} dz $$
Then the rendered equation appears as so:
\[f(a) = \frac{1}{2\pi i} \oint_\gamma \frac{f(z)}{z-a} dz\]You can also use \\[ and \\] as delimiters for display equations, and \\( and
\\) as delimiters for inline equations. The double slashes are only necessary in
markdown; if you’re writing raw HTML, then a single slash will suffice.
Customize Font Sizes
I found the fonts a bit oversized, so I wanted to change the size for the posts. In order to do this, you need to copy the entire folder which contains all the relevant scss files. In order to do this, do
cd $(bundle show minimal-mistakes-jekyll)
cp -r _sass /path/to/site
Now, after much digging through the GitHub issues,3 I found that the
file to edit here is _sass/_reset.scss. In my site, the relevant chunk of text
looks like
  @include breakpoint($medium) {
    font-size: 13px;
  }

  @include breakpoint($large) {
    font-size: 15px;
  }

  @include breakpoint($x-large) {
    font-size: 18px;
  }
Once this file has been edited, you should see the font size reduced in your page.
Getting it on GitHub Pages
Okay, now we write a bunch of nonsense, find some beautiful pictures at
Unsplash to use as headers, and we’re ready to publish the thing on GitHub
Pages. I’ll first go through as though we don’t want to use a custom domain, so
that the website will be exposed at USERNAME.github.io.
Enabling jekyll-remote-theme
First of all, make sure that you’re using the remote-theme jekyll plugin,
which allows you to use any jekyll theme that is GitHub hosted, rather than only
the few that are officially supported. This process is outlined on the Minimal
Mistakes website, but I’ll go through it here.
First, in your _config.yml file, enable the plugin by including it in the
plugins list, via
plugins:
  - jekyll-remote-theme
If you have other plugins you want to use (I use jekyll-feed), then add them
to this list as well. Designate the remote_theme variable, but do so after
setting the theme, so that you have in your config file
theme: "minimal-mistakes-jekyll"
remote_theme: "mmistakes/minimal-mistakes"
Finally, in your Gemfile, add gem "jekyll-remote-theme".
Push it to the repository
GitHub pages looks for a repository that follows the naming convention
USERNAME.github.io. So, for example, since my GitHub username is
peterewills, the repository for the source of this site is at
https://www.github.com/peterewills/peterewills.github.io.
Once you’ve created such a repository, initialize a git repo on your site by
going into path/to/your/site and doing git init. Then, do
git remote add origin https://www.github.com/USERNAME/USERNAME.github.io
and then commit and push. (If you’re unfamiliar with using git, I recommend either
of these tutorials.) You’ll get an email telling you that your page build was
successful, but you’re “using an unsupported theme.” Don’t worry about this; it happens
whenever you use remote-theme.
You now should be able to navigate to USERNAME.github.io and see your page!
Using a Custom Domain
Suppose you’d prefer to use a custom domain, such as mydomain.pizza (this is
actually a real, and available, domain name). There are lots of ways to do this;
I did it through Google Domains, so I’ll go through those steps.
First, you go to Google Domains, pick out the domain you want, and register
it. For this example, we’ll assume you went with mydomain.pizza. You should
now see it appear under the My Domains tab on the right side of the
page. You should see a domain called mydomain.pizza and a DNS option. This
is what we need to edit.
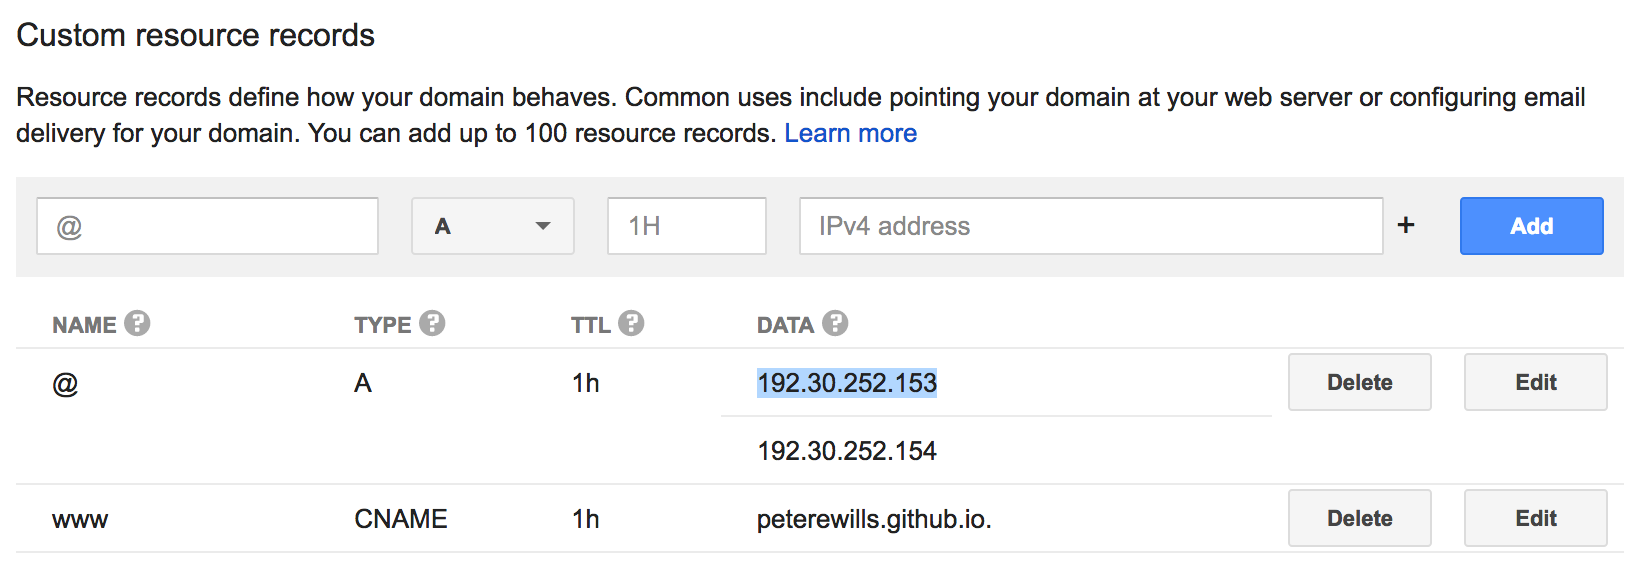
We need to configure the DNS behavior of our domain so that it points at the IP
address where GitHub Pages is hosting it. On the DNS page, scroll down to
Custom Resource Records. You’ll want to add three custom resource records;
two “host” resource records (designated by an A) and one “alias” resource record
(designated by CNAME). GitHub pages exposes its sites at IP addresses
192.30.252.153 and 192.30.252.154. So, you’ll want to add both of these as host
resource records. You’ll want to add your GitHub Pages url USERNAME.github.io
as an alias record. By the time you’ve added the three, your list of resource
records should look like the example below.
So, now your url (mydomain.pizza) knows that it is an alias for
USERNAME.github.io, but we still have to specify this aliasing on the GitHub
end of things.
To do this, simply make a text file called CNAME and include on the first line
mydomain.pizza
This is the entire contents of the text file CNAME. Once this is pushed to the
repository USERNAME/USERNAME.github.io, the appropriate settings should
automatically update themselves. To check this, go to the respository settings,
scroll down to the “GitHub Pages” settings, and look under “Custom domain.” You
should see something like the following:
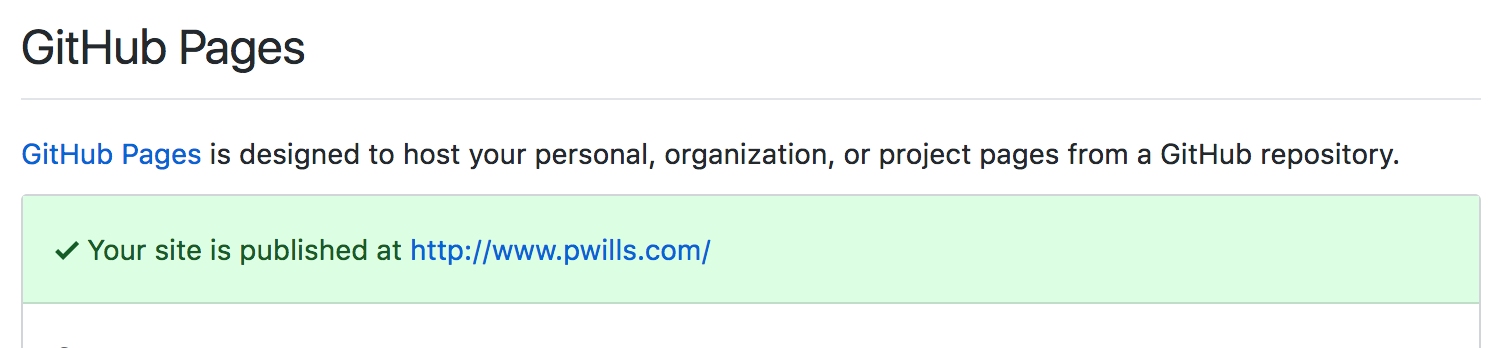
If the DNS record of your Google domain has not yet been updated, then you will
see Your site is ready to be published mydomain.pizza on a yellow
background. Note that it sometimes takes up to 48 hours for DNS records to
update, so be patient.
Once the DNS records have updated, you should be able to see your site at
mydomain.pizza.
Enabling Comments via Disqus
Minimal Mistakes has excellent support for comments built in to the theme. I chose to use Disqus as comments platform, but it supports others. If you choose to go another route, you can look on the minimal-mistakes guide for more direct assistance.
To get Disqus comments up and running, you should go to the Disqus
homepage and sign up. Eventually you should have a “shortname” that
you can use for your site. Once you have this, you just need to add the following to
your _config.yml:
comments:
  provider: "disqus"
  disqus:
    shortname: "my-shortname"
A Caveat
Even if you include this, you will not see Disqus comments appear in your posts when you
do bundle exec jekyll serve and look at the posts on localhost:4000. Why don’t they
show up?
When you build locally, you are by default building in the development environment. In
minimal mistakes, comments are only active in the production environment. You can test
what environment you’re in by including the following chunk of code on a page:
{% if jekyll.environment == "production" %}
   # YOU'RE IN A PRODUCTION ENVIRONMENT
{% endif %}
For more on environments, you can check out the official Jekyll docs. You should be able to run your local Jekyll server in a production environment by doing
JEKYLL_ENV=production bundle exec jekyll serve
but this never worked for me, so I had to test that comments were working by pushing to GitHub and looking at my posts live in production.
Using Google Analytics to Monitor Traffic
Minimal mistakes also includes nice support for google analytics. Similar to Disqus
comments, you’ll need to sign up for google analytics and follow the steps there to get
a tracking_id for your site. Then, in your _config.yml, include the following blob:
analytics:
  provider: "google"
  google:
    tracking_id: "XB-934572345-6"
You should then be able to use the Google Analytics dashboard to monitor traffic on your site. You can look at the minimal mistakes documentation on analytics for more details, especially if you plan on using a different analytics provider.
Conclusion
As I said at the beginning of the post, you can check out the repository for my
site to see examples of what I’ve gone through here; including my CNAME file, my
_include/scripts.html file that enables MathJax, and my _config.yml file. Please let
me know, either by email or in the comments, if you have any questions or corrections!
-
Presumably emacs. ↩
-
Some older blog posts discuss the process of adding kramdown as the markdown rendering engine, but this is default behavior for Jekyll 3.x, so there’s no need to do this step. ↩
-
Michael, the guy who built Minimal Mistakes, is really wonderful about responding to issues on GitHub, which are really used as a support forum for people using the theme who have no experience in web development (such as myself). ↩
Comments